Sunday, January 29, 2012

Tutorial for Recycled Gift Bag

 Gather materials:
A large piece of newspaper
 A 3 by 5 notecard or similary sized piece of heavy paper
Ruler
Stapler
Scotch Tape
Hole Punch
Scissors
Piece of string, twine or ribbon for handle, about 2.5 feet long
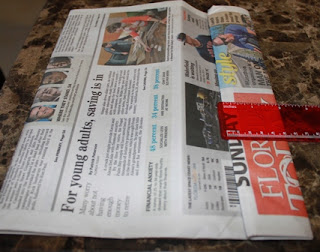
Take the large sheet of newspaper and fold it on the crease, just as it comes so that you have two layers of paper. 
Fold the left and right sides so that they meet in the middle and overlap by about half an inch.  You could staple these together, but my stapler is quite small and so I chose to use scotch tape on both the top and bottom of the overlapped portion.  You should now have a large continuous loop of newspaper.  To make sure the seam will be on the side of the bag instead of the front, just roll the loop so that the join in near one of the edges.  Now flatten your loop and lightly  cease the edges. 
Take the right edge of the flattened paper and fold over two inches.  Crease well.  Repeat on the left side.  You have now made the three creases you will need for each side, though they are not all pointed in the correct direction.    You can fold the edge portion toward the back to establish a crease in the opposite direction.
Tuck the center pleat in toward the center of the bag and firmly crease the new edges which will be the corners of the bag. 
Cut your note-card in half lengthwise (hot dog, not hamburger) and tuck it up between the two layers of the bag centered on each side. This will reinforce the area where the handles will attach. I found it really hard to get a photo, but there is half a note-card tucked up there near the top fold of the bag

Use several staples to secure the bottom of the bag.  Make sure your side pleats are carefully tucked inside. 
Further reinforce the bottom by folding the stapled portion over and covering with tape. 
Almost done now!  Take the bottom portion and fold up two inches.  Crease firmly.  Again, one side is creased in the correct direction and the other is not, fold in both directions to help the paper crease the right way. 
This is the magic part!  Carefully open each pleated side and and flatten the bottom. 
Put your hand inside the bag and use the table to crease the edges nicely and square up the bottom.  Punch two holes along the top edge, about 3 inches apart centered on each side. 
Loop the string through all four holes and tie decoratively.  Sydney was my handle maker and did a great job!  She even inserted a decorative tag on the handle of each bag. 
Tada! You have made an adorable gift bag out of something most people just toss.  Try matching the section of the paper to the personality of the recipient.  Cartoons for the kids, sports pages for the athletes, sales circulars for the shoppers....
Please let me know if you try the tutorial, I'd love to see what you make. 

Saturday, January 28, 2012

Recycled Crafts

Every other Monday we have clubs at the end of the school day.  This semester mine is a Recycled Crafts Club and I have been on the prowl for ideas.  Last time we worked on Origami boxes out of leftover greeting cards.  This week I thought we might make some gift bags out of newspaper.
I was also looking for some bags to use for the upcoming Girl Scout leader daughter camp-out.  I was out shopping for goodies this afternoon and thought it would be more fun to make a container than to buy one.
The girls helped me set up an assembly line tonight and we got a good start on it.  I wish there were enough comics to do all of them, but some are made out of more mundane sections of the paper.  Maybe if I ask nicely I can get some free labor out of my craft club students on Monday?  I found this tutorial on youtube that had directions, though I changed it up a bit.  I can post a tutorial if anyone is interested, I'll need some directions for recycled crafts club as well. 

Girls Day

Today the girls wanted to go out and do "girl" things. So first we went and got our toes done, then our hair cut, had a nice lunch out and finished with a little shopping.
First though, I whipped up this happy little crumb star and wanted to do a quick tutorial.
This is perfect for using up all of the extra triangles left from joining binding. I was almost out of red crumbs last week until I made binding for a place-mat and added a bunch of extras back into the jar.
To make a star, you need 8 of those triangles along with four background rectangles that are 2 by 3.5 inches, four two inch squares and one 3.5 inch square.  I used a crumb square of course, because I still had a few leftover as well. 


Just arrange one of those triangles, right sides together, on top of a rectangle of background fabric and sew it so that it will cover the background when flipped.  This is the trickiest part, making it bigger is OK, but try to make sure it is at least big enough to cover the background.
Now iron the triangle and use scissors to trim it even with the edges of the background fabric.

Repeat on the other side, arranging the triangles so that they are both on the same side and facing the correct direction.

Iron and trim again.  I usually trim the background fabric from behind flip and sew triangles, but in this case I left them in because not all of my triangles covered perfectly.  As long as everything was within a quarter of an inch of the edge, it was a keeper.   Then the background stayed in to maintain the correct size and seam allowances. 
Make four flying geese units as shown above and arrange them into a nine patch formation. 
Press and enjoy.  A happy crumb star that uses up all of the extra binding bits. 


Last Scraphappy Red Saturday

 January is almost over and I've had fun playing with all my little red bits.  I am torn as to whether I want to make some wonky little crumb stars today or try out the really cool geese circles that I saw last week on Celine's blog.  The stars might win out just because I have limited sewing time this weekend.  There is a big Girl Scout camping weekend coming up and I am helping out with a few of the little details.  Anna wants to help with the shopping and get her hair cut as well so it might turn into a mother daughter day instead of a sewing to my heart's content day. 


Wednesday, January 25, 2012

Tiny Tuesday - Work in Progress

I meant to work on a Midget Block last night as soon as the kids were in bed.  Kurt is out of town, so there isn't much extra time when everyone is awake.  When I woke up on the couch at 8:15, they kids had already tucked themselves in and I couldn't ever get woken up enough to accomplish much at that point.  I was sure I'd be able to whip one up tonight, but I came home to a chorus of excited voices letting me know that the science fair winners needed to go to an awards ceremony instead. 
So here is Anna with her award for 6th grade in the category of biological, and Ryan with his award for 5th grade in environmental.  They are all quite excited of course and wanted to know if they could have celebratory frozen yogurt after the awards. Can't say no to that. 
Finally, here I am with all the kids stuff done, and not a lot of time and energy. Applique fits that bill nicely, so I pulled out one of the blocks that was prepped and ready from the cruise at Christmas.  There is still one petal to sew down, so I thought I'd show a shot of how I prepare my pieces for applique.  Tracing the template onto freezer paper, I iron the shiny side down to the wrong side of the fabric and cut out with a quarter inch seam allowance.  After clipping the curves, I use a glue stick to turn the edges under, sticking them right to the paper.  I sew everything down with the freezer paper still in there, using a blind hem stitch.  Although it is a bit stiff, and hard on the thread, it allows the edges to stay just where you want them without the skill and finesse needed for needle turn.  The finished block takes a quick bath in the sink, to dissolve the glue, and then the paper comes out easily after the background fabric has been trimmed away.  Teresa at Fabric Therapy has some nice tutorials for glue-stick applique, though she puts her freezer paper on the right side of the fabric.   I've tried it this way, as it solves the problem of having to remove the paper from the back later, but it seems to take a bit of skill and I just don't have the knack yet. 

Sunday, January 22, 2012

Place-mat done

 Most of yesterday was a big nap and some cold medicine, but I did finish up this red crumb place-mat in the evening.  It is made from 6 crumb blocks that were squared up to 6.5 inches.  I usually add sashing strips to crumb blocks because the seams can get bulky along the edges.  I was regretting that decision as I tried to get everything to lie flat, but it ended up working out, even if some of the junctions are a bit bulky, 
I quilted the middle with a small meander, not quite a stipple.  Then in the border, I experimented with some pebbles. I've seen them on other quilts, but never tried them myself.  They were time consuming and make the quilt as stiff as a board, but for this small project that doesn't matter.  I wouldn't want to try them on a bed quilt though. 
  The back was a leftover fat quarter.  It wasn't quite long enough, so I inserted this strip which matched the border from the front. 

Saturday, January 21, 2012

ScrapHappy Saturday - Still Painting the Town

Just two more red Saturdays to go and I find I'm wanting to start too many projects based on red inspirations from last week.  I've got these red crumbs pulled out that were leftover from something else.  I think I'll turn a few into a place-mat today. 
I've managed to pick up a cold from being back at school, so OJ and a nap are also high on the list for the day.  Use the linkup below to show off you own progress.

Tuesday, January 17, 2012

Tiny Tuesday - Oak Leaf

This one is another of the extra applique blocks that I prepped to take on the cruise.  A few minutes here and there do add up as long as you have something ready and waiting. 
The block is called Oak Leaf and is appliqued in 6 pieces. Easy peasy.  

Monday, January 16, 2012

Monday Miscellany

I had grand plans of quilting maniacally on the long three day weekend.  Instead we spent most of the time working on science fair projects.  As a science teacher, I should really love science fair projects more.  All the research was already done, but there was still typing and printing and pasting to finish.
Ryan studied the effect of different temperatures on the rate of photosynthesis in elodea.  See his nice bubble graphs?  He learned a lot about using excel spread sheets. 
Anna tried to kill E. coli with UV light. I learned that working with bacteria isn't worth all the paperwork involved. 
I tried to sneak in a few minutes of sewing in amongst all the science fair fun. So far I have the first few rows of Flamingo Bay sewn together. I only had to frog stitch one block today because it was rotated the wrong way. Yesterday I sewed backwards more than forward.

Midget Mania Mini Monday

I cleared some slowly ongoing projects off the the design wall to make room for my midgets.  Every so often it is fun to pull them all out and admire the progress so far.  It looks like I have finished about 69 blocks up to this point.  I think the original quilt has 187 blocks in it, so there is still a long way to go.  Each block finishes at about 4 inches and the patterns are available at Sentimental Stitches. Jill does a link up on Tiny Tuesdays for people working on these blocks or other small ones.  I'm trying hard to make at least one block a week in the new year.  Wish me luck.
The other wall contained the part of Orca (Flamingo) that would fit.  All the blocks are done and I started yesterday on sewing the rows together.  If I hadn't been pulled away to help with science fair projects there would have been a finished top to show this morning. 
As it is I have a partially assembled quilt on the floor and machine waiting for a few minutes of assembly time and just hoping that the dog doesn't decide to do her little circle running thing and jumble everything up.  Make sure you go to Judy's blog to see what other people have on their design walls and to Bonnie's blog to see how all the Orca Bay quilts are progressing. 

Saturday, January 14, 2012

Big Sigh of Relief

All of the blocks for Orca (Flamingo) Bay are officially done and ironed!  I got the last of the geese units sewn today and then went on a big ironing marathon.  My design wall isn't big enough to hold the entire quilt at one time, I think I'll take over some floor space in the morning and put all the pieces together.  I feel like it has been ages since I've finished anything.  The border is still looming, but I'll feel lots better when the rest of the top is complete.  For tonight though, I reserved two redbox movies  and dinner is just finished with the dishwasher doing its thing. 
 

Mini Nine Patches

These are made from one inch strips.  With the seam allowances on either side, that leaves only half an inch of fabric in the middle square.  I'm not sure what I'll do with these, but for now I'll set them aside with the plan of adding some more colors as the months go on.  I worked a tiny bit on Flamingo Bay this week, but didn't have much time in the evenings.  I have quite a bit of school work this weekend, but I'm not quite ready to jump in this morning.  For now, I'll head back to sew for just a tiny bit.......

ScrapHappy Saturday

Feeling scrappy today?  I've had a frantic week at work, but this is a three day weekend for us and I am looking forward to spending a bit of time in the sewing room today.  I was dreaming last night about nine patches.  I don't know why, but I'm going to go and play with some to see just how small I can make them.  What scrappy happenings are going on around your house today?
I'm hoping the link up works better today than last week.  My membership was ready to expire and I thought I had renewed and upgraded, but somehow I goofed it all up and the pictures disappeared on me.  Hopefully today it will work with pictures and links as well. 


Tuesday, January 10, 2012

Tiny Tuesday - Pride of the Prarie


This is Midget Block 65 which is called Pride of the Prairie. It was simple to make, though I didn't follow the directions exactly.  I went ahead and cut squares in half, but then glue sticked the freezer paper prepared pieces in place temporarily.   Then I took them to the machine to sew the parts back together again. That left everything well secured and allowed me to carry it along to hand sew the edges without worrying about exposed bias edges.  The little circle was put on top of all of that, leaving LOTS of layers that I will have to cut away from the back at some point. 
I switched up the color arrangement just a bit, I like the alternating blue and green in the background. So, block 65 adds 20 pieces to the quilt and was freezer paper pieced along with machine sewn subunits. 

Monday, January 9, 2012

Design Wall Monday January 9, 2012

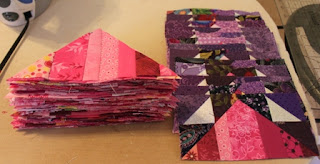
 My design walls seem to be Bonnie Hunter patterns all the time these days:)  First up is my Orca Bay so far.  I finally was home long enough to get some work done this weekend.  I'm still in the process of putting together the pink string geese, but all the parts are there, so it is going fairly quickly.  My version is called Flamingo Bay for Florida. 
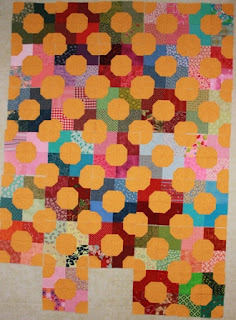
Next up are my cheddar bow-tie blocks.  I am loving this setting and color groupings, now I just have to figure out how big it wants to be so I know when to stop.  I think Bonnie is having a link up for the bow-ties on today and Judy always has her design wall on Mondays, so be sure to stop by and see what everyone is up to.

Sunday, January 8, 2012

Step by Step

It was a day of incremental steps.  The string blocks for Orca Bay finally got finished up last night in the wee hours.  Instead of following the directions for the order of trimming I decided to try something different.  Without squaring them up first, I just cut them in half.  
 The nice thing about doing it this way was that I could control the little corner triangles and avoid tiny little pieces on the ends.
I'm still working on getting the corner triangles sewn onto the string blocks, but I wanted to get at least a few blocks put together to see how it is going to look. 
Then I felt like I needed to spend some time working around the house, I decided to tackle the downstairs linen closet.  It has been on my list for while now
Tiny little islands of order make me happy.  If not for the job and the three kids and all the quilting, maybe I could make my whole house look this neat and tidy?  Well, maybe I'll just enjoy the closet for now instead of getting carried away. 

Saturday, January 7, 2012

RS12 - ScrapHappy Saturdday

January has been devoted to the color red.  I've already seen some red projects showing up out there.  As for me, I'm still percolating and trying out red projects.  I've been pondering lots of tiny log cabin blocks in all of the colors of the rainbow.  These little guys finish at 2.5 inches.  They seem to be a bit labor intensive (7 blocks in about 2.5 hours), but boy do they do a great job of using up even the tiniest of scraps.  What are you up to on this red letter day?  Use the linky below to share your own progress so far. 


Thursday, January 5, 2012

Tabs

Check out the tabs at the top of my blog.  I've moved some of the margin lists to their own individual pages. 
Did you see the Moda Bakeshop pattern for today?  It is a Barn Raising layout done in 1930s solids.  I am not imagining doing it in solids or from a jelly roll, but wouldn't it make a great leader and ender project?  It is really just a nine patch done with three lights and 6 dark or mediums.  Wouldn't it be super cute done with scraps?